I've dabbled with recording and streaming capture content in the past. Nothing professional, but enough that I always wanted to make modifications and tweaks to the video and audio content. One thing that always bugged me was how all of the audio was compressed into a single track. I couldn't adjust my microphone volume or that of my friends on Mumble...
So, I decided to look into how other YouTube/Twitch streamers have approached this problem. I figured it would be enlightening and may help me down the road.
Who is this article for?
This is not meant to be a quick and dirty, single-button solution for recording and steaming captured video/audio content.
There are plenty of tutorials that will get you up and running using the bare-bones setup in minutes. This outlines the steps necessary to set up OBS (Open Broadcaster Software) Studio and record the footage in a way that is easy to manipulate down the road if you want to do further edits.
So what am I trying to accomplish here?
Good question! In this article we are going to cover the following:
- How to isolate your game sounds from other applications like Mumble or Skype for easier editing down the road
- Setting up a popular recording tool (OBS Studio) to both stream and record content
- What setup and application settings worked for me
How Are We Going to Accomplish This?
Glad you asked! We'll go through the nitty-gritty shortly, but here's the short answer:
- We're going to install VB-CABLE to isolate your game sounds from other applications like Mumble or Skype.
- We'll go over VoiceMeeter and why it's important for mixing audio streams together.
- After that, we'll go over the steps necessary to get OBS recording good quality video
- Once set up, we'll discuss recording multiple audio tracks
- We'll add game footage to the OBS "scene"
- Finally, we will discuss the next steps: streaming to an online service
Alright, excited yet? Let's get started!
Installing VB-CABLE Virtual Audio Cable
VB-CABLE Virtual Audio Cable is a driver for Windows that provides a virtual input and output device to pipe sound through. Why is this important? It has to do with how Windows handles audio.
Normally, audio is piped to your 'default' playback device. You may play your system's sound through your speakers or headset via a hardware connection line out, HDMI, and so on. Unfortunately for us, this means all of the sound gets compressed into a single stream. When you record game-play, there's no way to separate the in-game sounds and the sounds of your friends talking.
Enter VB-CABLE. This creates a virtual cable connecting an input (recording) device and an output (playback) device. If you pipe your Mumble content in one side, it comes out the other. Most importantly, it's a separate audio stream you can record separately and mute, adjust and modify at your leisure.
So, what do you do now?
Step 1: Install VB-CABLE Virtual Audio Cable
Step 2: Install VoiceMeeter (don't worry, we'll discuss this bit soon)
Step 3: Reboot. Yes, this is necessary otherwise the playback/recording device names won't be setup correctly.
Step 4: Open sound preferences from the Start Menu bar

(UPDATE 9/28: If you do NOT see the input/output devices with the same names, try restarting. I noticed that the names change after the first reboot. Really frustrating...)
Will you look at that... now, you may be confused about why the speakers are called "inputs". Consider this: we're connecting outputs to inputs. Playback devices are what apps output their sound to.
This creates an isolated path to your recording software so you don't mix audio from your system and the noise coming from your other sources.
Step 4: You are going to want to select "VoiceMeeter Output" as your primary recording device, and "VoiceMeeter Input" as your primary playback device.
Using VoiceMeeter
This is where the rubber really hits the road. You've got these two new "virtual" cables connecting inputs to outputs. That's great... but there's only one problem...
Windows can't listen to more than one device at a time.
Oops. Well, not oops, because we prepared for this eventuality. We've got your system sounds to play through the VoiceMeeter Input device (labeled VB-Audio Virtual Cable), and we're going to put Mumble/Skype on the other input (VB-Audio VoiceMeeter VIAO. Don't ask me why they're called this, it's not super intuitive).
We're going to need to mix these devices together if we want to hear both of them in our headset. This means we'll get the benefit of splitting out our audio AND be able to listen to it at the same time, which is... sort of important.
Here's a preview of what we're trying to accomplish. Hopefully this diagram will help you visualize the path the sound is going to be taking.

Make sense? Let's move on to setting up VoiceMeeter. If all goes well, we should be able to hear all system and voice chat sounds after these cables are pieced together.
Step 5: Open VoiceMeeter
Step 6: Add hardware/virtual input and hardware output devices. It's best if you just model it after what I've done below. Note that your hardware out should be whatever device you normally listen to sound through (headsets, speakers, etc) and that is normally the default playback device.

Yes, this looks complex and intimidating! However, the only things you have to change are the top tabs, setting each channel to the correct input/output device.
Step 7: Watch and listen! Try playing sound through your system. The sound bar under the second hardware input should light up. AND, you should hear sound coming out of your speakers like normal. We haven't connected anything to the Virtual Output just yet.
Step 8: Go into the audio settings of Mumble/Skype and change the output device to the VB-Audio Voicemeeter VAIO device (the virtual input)

Now return to the VoiceMeeter window and try talking to someone on Mumble or make a test call in Skype. You'll see the sound bar underneath the virtual input light up and you'll know you're all set!
"Awesome! Now what?"
Next... we set up OBS Studio and start recording stuff!
Preparing to Record in OBS Studio
We've got our goofy audio setup ready, now all we need is to find something to do with it!
Step 9: Install OBS Studio. This should be self explanatory.
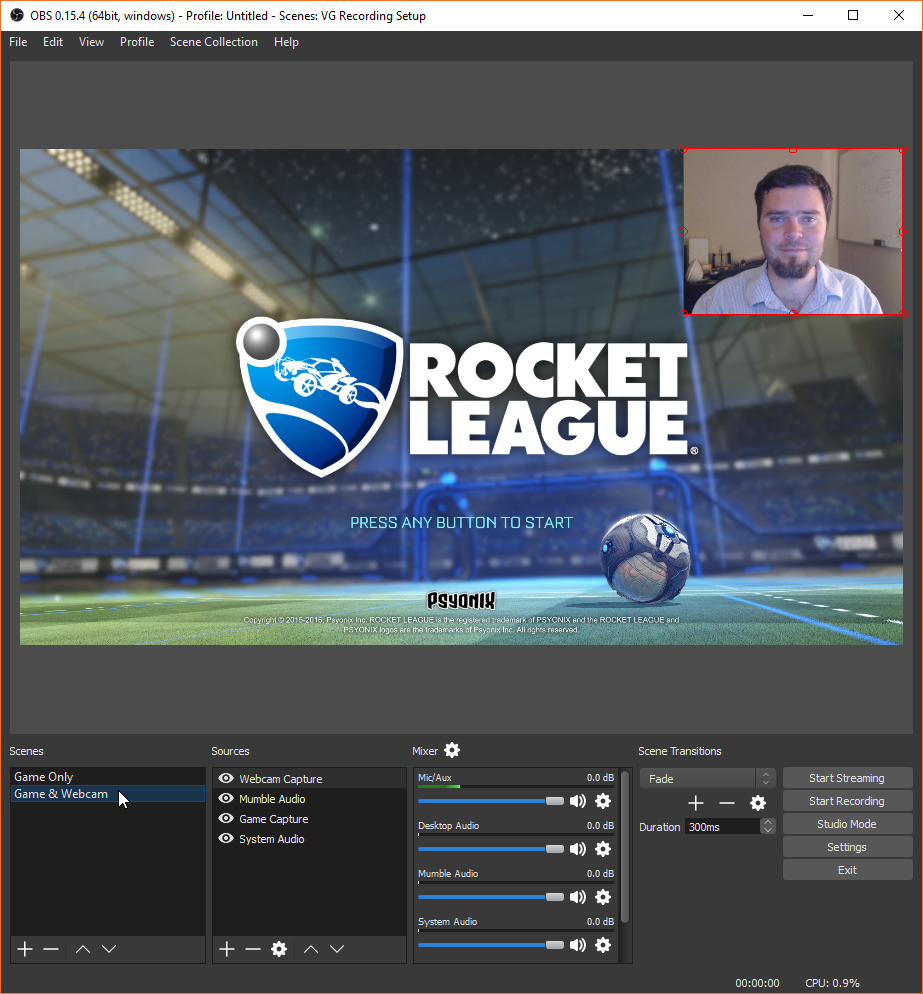
Open the application and you'll see something like this:

The main screen is broken into a few major panels:
- The Main Preview Panel which shows what your recording/stream currently looks like. It's black right now because we aren't capturing anything.
- The Scenes panel. Each scene describes a collection of capture sources and how they are arranged on the screen. This allows us to use picture-in-picture of webcam feeds or the ability to swap between different views.
- The Sources panel which describes each of the major capture sources (audio and video) available for the current recording/stream.
- The Mixer panel which allows for fine-grain control over each audio feed
We'll get back to these in a minute. First, let's take a look at the "Settings" window.
Setting Up Recording/Streaming Settings
There's a ton of useful features in OBS Studio, and we're only scratching the surface. If I don't mention something, it certainly doesn't mean it's unimportant... it just means I am focusing on getting us to a working state. So let's get started.
Step 10: Open up the "Settings" window and click on the "Output" section to the left.
Once inside, you should find yourself inside of a "Streaming" sub-tab. I'm not going to focus on streaming, but because recording and streaming can share the same video encoding settings, this is just a natural place to start.
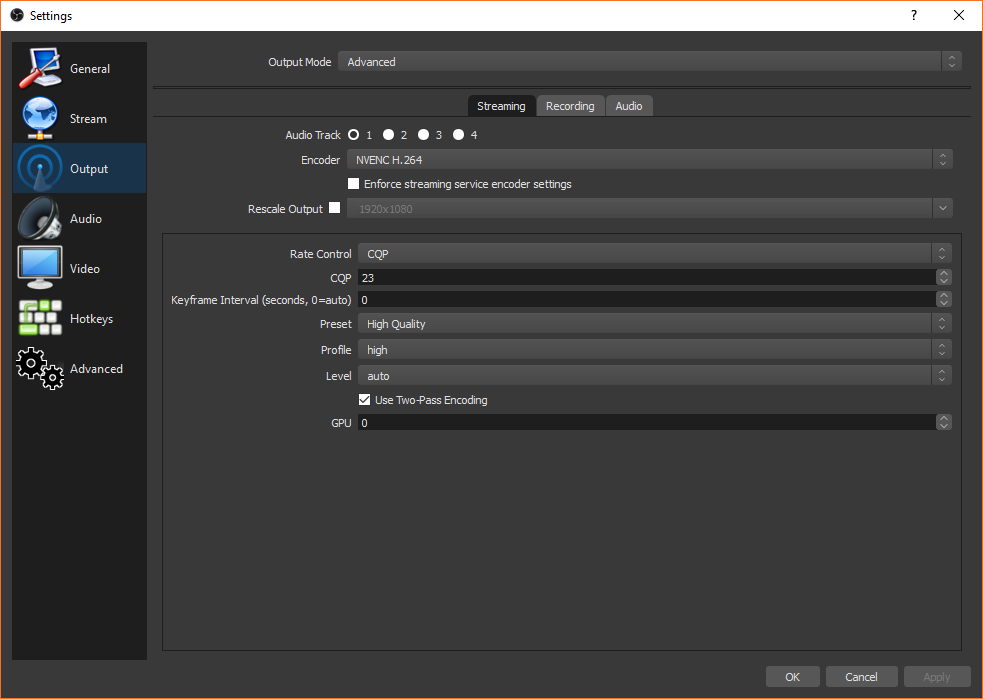
Your settings won't look precisely like mine, because I made a few important changes. Follow after me:
- Change Output Mode to "Advanced" to show more information
- Change Encoder to a hardware encoder like "NVENC H.264" for high performance
- Set Rate Control to "CQP". Constant Quantitative Parameter allows you to set a quality level. Leaving that value at 23 is fine.
- Set Preset to "High Quality"
- Set Profile to "high"
These are the basic settings I used to achieve a decent quality on my recording without doing anything too drastic. This is also a good streaming setup as well.
Step 11: Click over to the "Recording" sub-tab
We're going to make a few changes here that won't be absolutely necessary to start streaming, but will take full advantage of the virtual lines we created earlier.
- Change the Recording Format to something other than FLV. Flash Video does not support multiple audio tracks. I suggest MP4, but really anything else should work.
- Check all of the Audio Track check marks. This basically lets OBS Studio know that we want four audio tracks in our video (microphone, mumble/skype, game audio, and combined)
Step 12: Select the "Audio" sub-tab. Name the audio tracks for easy reference.
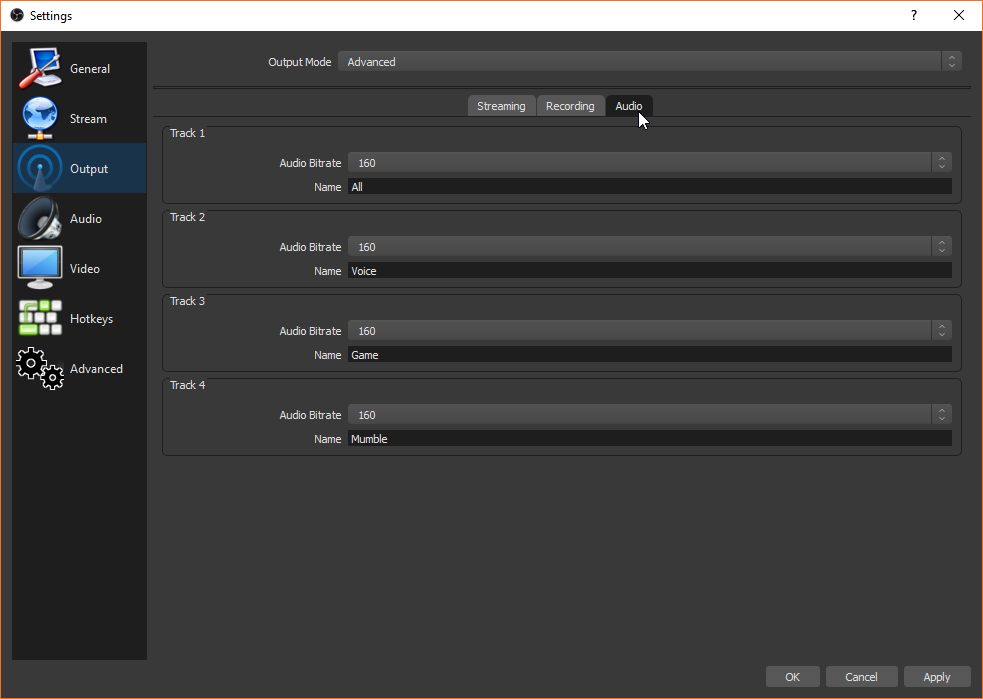
This is mostly for later reference when you're extracting audio data from the recorded video. Not necessary, but really useful.
Step 13: Select the "Video" section on the left to look at the video settings.
Not much to be changed here. I suggest Lanczos downscaling if you're actually downscaling to a lower resolution, but we're keeping the resolution at 1920x1080 for the time being.
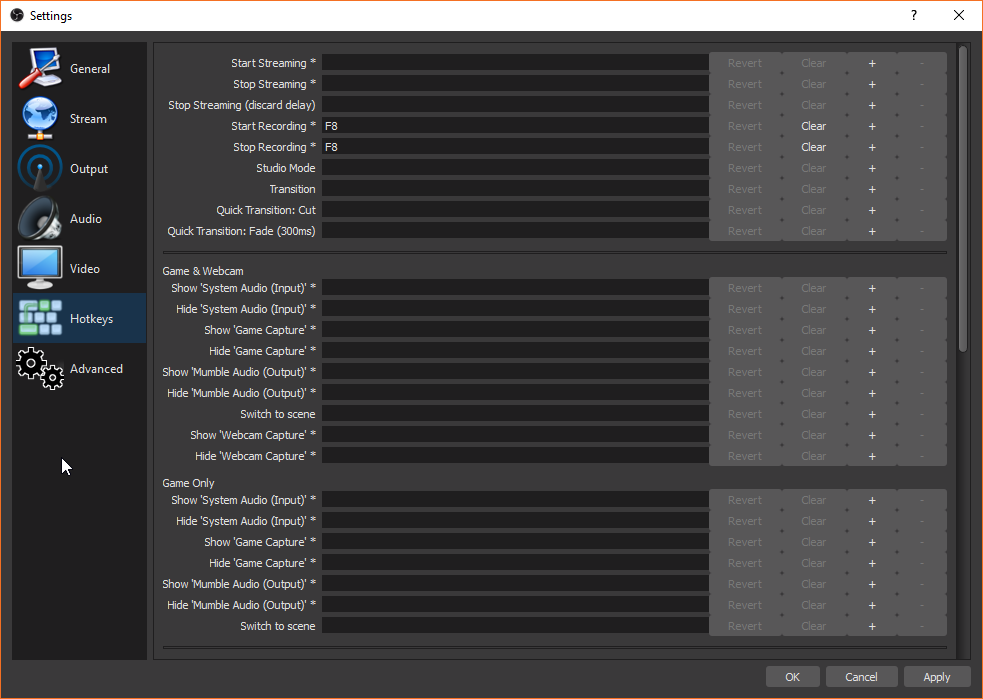
Step 14: Select the "Hotkeys" section on the left to add recording/streaming hotkeys.
You won't want to be tabbing out of your game to start/stop recording. There are more complex hotkeys available to you, but those are the bare minimum I suggest changing.
Now that we've gotten this far, let's go back to the main window and start adding some capture content to record!
Adding Sources to OBS Studio
Here's an example of a scene configuration that includes video capture of a game along with the audio capture of the mic, mumble and system audio all in separate tracks.

Notice that we have sources for almost all of these components (Desktop Audio and Mic/Aux audio came by default in the scene)
Let's set this scene up!
Step 15: Add a game capture source.
Do this by pressing the "+" sign at the bottom of the Sources tab and select "game capture". You'll be given some options. OBS allows you to record full screened games automatically, windowed games, or even portions of your monitor. Here's a simple example:

Once you've added this to your list of available sources, it will automatically be added to the scene and made visible. If you see black, don't worry! The game is likely not fullscreen right now, and isn't being captured. Tabbing into the game will change that.
Step 16: Add the system (game) audio capture
We want to capture the audio being sent to the system's default playback device.

Step 17: Add Mumble/Skype capture, assuming you even want it in your recording (remember, you can always remove it later!)

You're nearly there.
One last thing...
Separate Audio Inputs Into Tracks
Right now you're capturing all of those audio feeds you so carefully broke apart into one track. OBS Studio makes it easy to control which feeds are added to which track. This is drop-dead simple for us, since we want the tracks broken up into the following categories:
- Combined audio (for streams and ease of access)
- Microphone audio (so you can make your audio as clean as possible
- System (Game) Audio
- Mumble/Skype audio
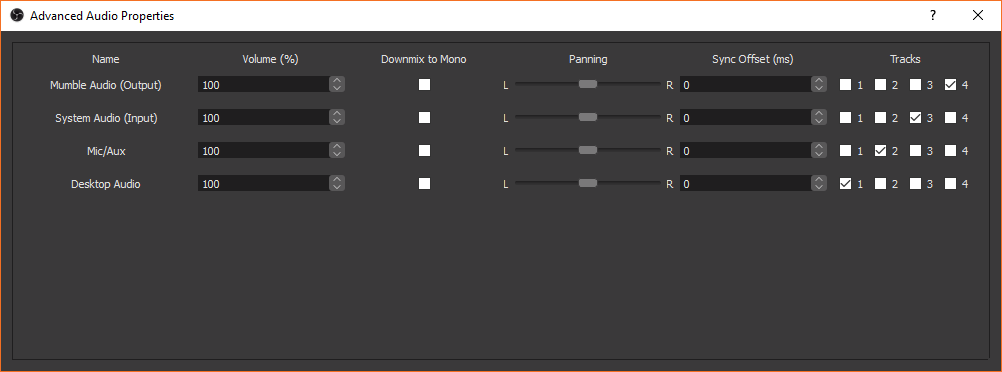
Step 18: Go to Edit//Advanced Audio Properties and change the checkboxes to look roughly like this:
THAT'S IT
YOU'RE DONE
GO PLAY SOMETHING!
I hope this was useful. If you find any inconsistencies, or areas you felt could have used more detail or fleshing out, please let me know. Drop me a line at chris@mrvoxel.com.
PS: Here's another example of a scene I set up with a webcam as one of the input feeds.